Allo, allo, allo!
Been a while and hope we're good? I am! The very fact that I can type this, makes all things bright for me... lol...
So recently, I wanted to try out this filled cupcake recipe, and then I got distracted by the recipe below found on my baking brick of Stalk margarine...

So in my post on Surf cakes, under the Butter vs Margarine section, I explained why I loved Stork margarine as a butter alternative. I hope you find it useful.
So back to my story, in the end, I postponed my pursuit of filled cupcakes till later and went on a search for chocolate powder 😃!!
Three shops and a zillion steps later, I was the proud owner of these beauties and was ready to bake my first layered cake!!! Whoop whoop!!!


After measuring out 4 scoops of my 1/2 cup of flour to get 500ml of flour, I had to figure out how to get that weird 20ml in the recipe. Weird because I had no 20ml cup!!!
In walk my 80ml cup, 30ml cup and basic arithmetic to tackle our joyous 'story problem!'
Before I continue, in case I've lost you on the 'story problem' from Primary school, let me chip this in:
When I was in Class 3 or so, we started using maths to solve simple daily problems. We called them story problems, an everyday problem like measuring up our sugar accurately on the scale up there, or the measuring the flour as follows. From them, we needed to figure out what our variables were, our constants, what was needed, what the bottle neck was and then work out an equation that gave us the answer!! Whoop whoop!! I loved them... and still do... so I actually get excited when I need to create a formula from simple things like this. I understand if you may not relate, I'm pretty excited about numbers, math and algorithm, but before I bore you further (if you aren't excited), do forgive, I digress... 🙈🙈
So how do we get the needed 20ml of flour? 80ml minus 30ml minus another 30ml gives us 20ml!!! Whoop whoop!! Doesn't that feel smart 😃 If it doesn't, no fears, I love to celebrate so at this juncture I'll do a little dance to that... heeheheee 💃💃💃
Let's continue with the picture story, shall we?


Another moment of dancing for the smarty pants, we just got the 20ml... lololll.... 💃😂💃

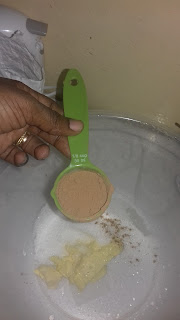
This is our salt... doubled... actually 150% more in this case... a teaspoon is 5ml, the recipe said 2ml... #hackalert

Pleeeeeease use butter NOT margarine for this recipe. Don't substitute unless you can confirm it's a butter alternative like Stork margarine. Margarine is awesome for dense and heavy pastries & cakes... not the light and fluffy we're trying to achieve here 🙂🙂

So my Stork baking brick is 500g so getting the 125g was kinda easy... 500g in two gives me 250g in two gives me... you guessed right, 125g! So here we are with approximately 125g of Stork margarine (or in your case real butter if you used that) in our ceramic bowl below waiting to be melted...


I put this in for a minute and watched the rest of unmelted Stork margarine melt into the surrounding hot fluid. I felt letting it all melt in the microwave may 'burn' it. I guess that worked well...

Whisk the batter once more so it's still as fluffly as possible before adding the other ingredients...


At this point, the number of times you mix the dry ingredients into the batter increases how heavy the cake will end up. So, try to fold in the dry ingredients with as few strokes as possible. Ideally, do this by adding the dry ingredients a bit at a time; it often helps. #hackalert

Remember to grease your baking mould!!!
I didn't have two round 20cm tins so I dumped all of mine in one rectangular one... I had to call my awesome Cake maker friend to give me tips in getting two separate pieces in the end. I'll tell you what I did that helped at that moment.


Till you see that your cake no longer rises after 10mins, don't open the oven door! Many a cake fall flat by this sudden change of temperature the oven door (or a suddenly reduced 'flame') causes. If you need to reduce the temperature in any way, try to do so after the tip above and/or when the surface of your cake looks crusty and not soft or smudgy. The no-longer-rising check is often more reliable to me. #hackalert

So in all confession, I burnt the cake... again... 😒... unfortunately my current oven has no gas mark caliberated or temperature caliberated dial. Although I did find this historical explanation on oven calibrations useful, I still have to learn to set my dial just right. I drew out that it should be on low flame, still wondering how low low should be...
Anyway since I did burn the cake, my call to my Cake maker friend became very useful. I needed to know what knife I should use to carve cake... her response, a bread knife or a sharp carving knife would do well... I chose the carving knife. It gave me a smooth cut without having to saw and lose more cake in the crumbs that would have fallen with each stroke. The carving knife I used was that sharp! You can check out these and other knives here if you need a visual or brief descriptions.


With a piece of my first layered icing cake...

... and my make-shift cake display housing what remained of the cake...
... this lengthy Ndudu tales post comes to an end. On behalf of the Ndudu team, thank you so much for reading. Do leave your comments below...
And do let us know if you tried this recipe and used any of our hacks.
If you learnt anything new, or simply enjoyed this read, please like this post and/or share with others 😊
Till we meet here again, have a wonderful baking experience whenever you get to bake and an awesome Foodie experience with each bite or drink you have 😁
Been a while and hope we're good? I am! The very fact that I can type this, makes all things bright for me... lol...
So recently, I wanted to try out this filled cupcake recipe, and then I got distracted by the recipe below found on my baking brick of Stalk margarine...

So back to my story, in the end, I postponed my pursuit of filled cupcakes till later and went on a search for chocolate powder 😃!!
Three shops and a zillion steps later, I was the proud owner of these beauties and was ready to bake my first layered cake!!! Whoop whoop!!!

I am honestly getting used to these photo stories, so as with some posts, I'll chip in where I deviated. I hope you have fun reading, and baking it if you do try... I did!!! Lol...
Ready? Let's go!!
The cake itself
Just an FYI, I had never baked a cake from creaming the eggs and sugar first. I always started with sugar and fat, eggs came after that... so this method is my first, and actually a pretty good first, surprisingly... lol...

So this is one thing I love about baking, exact measurements often make me think of mathematical story problems from Primary school. We'll be using subtractions a lot in this recipe, due to the tools I had. Here, we need to find the weight of the empty bowl before we weigh out our sugar.

Here, I used half the sugar the recipe specified. More a personal choice than a technical reason, I tend to find the sugar specified in almost all recipes I discovef too sweet... in fact damagingly sweet... lol... emphasis on my personal opinion. So as implied in my post on Surf cakes, under the Sugar section, I try to reduce all sugar quantities in recipes I find. As a general rule, I either use half or two-thirds of sugar required. Often half works well with double the salt. #hackalert


Now a tip here, when the recipe says fluffy, it actually means fluffy... lol... not just lighter and creamier... fluffy... till your batter reminds you of light clouds in the sky, or whipped cream, or the word 'fluffy' itself... don't give up, don't lose hope, keep whisking!!! You're closer now than 30 seconds ago 😃😃


After measuring out 4 scoops of my 1/2 cup of flour to get 500ml of flour, I had to figure out how to get that weird 20ml in the recipe. Weird because I had no 20ml cup!!!
In walk my 80ml cup, 30ml cup and basic arithmetic to tackle our joyous 'story problem!'
Before I continue, in case I've lost you on the 'story problem' from Primary school, let me chip this in:
When I was in Class 3 or so, we started using maths to solve simple daily problems. We called them story problems, an everyday problem like measuring up our sugar accurately on the scale up there, or the measuring the flour as follows. From them, we needed to figure out what our variables were, our constants, what was needed, what the bottle neck was and then work out an equation that gave us the answer!! Whoop whoop!! I loved them... and still do... so I actually get excited when I need to create a formula from simple things like this. I understand if you may not relate, I'm pretty excited about numbers, math and algorithm, but before I bore you further (if you aren't excited), do forgive, I digress... 🙈🙈
So how do we get the needed 20ml of flour? 80ml minus 30ml minus another 30ml gives us 20ml!!! Whoop whoop!! Doesn't that feel smart 😃 If it doesn't, no fears, I love to celebrate so at this juncture I'll do a little dance to that... heeheheee 💃💃💃
Let's continue with the picture story, shall we?


Another moment of dancing for the smarty pants, we just got the 20ml... lololll.... 💃😂💃

This is our salt... doubled... actually 150% more in this case... a teaspoon is 5ml, the recipe said 2ml... #hackalert

Pleeeeeease use butter NOT margarine for this recipe. Don't substitute unless you can confirm it's a butter alternative like Stork margarine. Margarine is awesome for dense and heavy pastries & cakes... not the light and fluffy we're trying to achieve here 🙂🙂

So my Stork baking brick is 500g so getting the 125g was kinda easy... 500g in two gives me 250g in two gives me... you guessed right, 125g! So here we are with approximately 125g of Stork margarine (or in your case real butter if you used that) in our ceramic bowl below waiting to be melted...


I put this in for a minute and watched the rest of unmelted Stork margarine melt into the surrounding hot fluid. I felt letting it all melt in the microwave may 'burn' it. I guess that worked well...

Whisk the batter once more so it's still as fluffly as possible before adding the other ingredients...


I didn't have two round 20cm tins so I dumped all of mine in one rectangular one... I had to call my awesome Cake maker friend to give me tips in getting two separate pieces in the end. I'll tell you what I did that helped at that moment.


Till you see that your cake no longer rises after 10mins, don't open the oven door! Many a cake fall flat by this sudden change of temperature the oven door (or a suddenly reduced 'flame') causes. If you need to reduce the temperature in any way, try to do so after the tip above and/or when the surface of your cake looks crusty and not soft or smudgy. The no-longer-rising check is often more reliable to me. #hackalert

So in all confession, I burnt the cake... again... 😒... unfortunately my current oven has no gas mark caliberated or temperature caliberated dial. Although I did find this historical explanation on oven calibrations useful, I still have to learn to set my dial just right. I drew out that it should be on low flame, still wondering how low low should be...
Anyway since I did burn the cake, my call to my Cake maker friend became very useful. I needed to know what knife I should use to carve cake... her response, a bread knife or a sharp carving knife would do well... I chose the carving knife. It gave me a smooth cut without having to saw and lose more cake in the crumbs that would have fallen with each stroke. The carving knife I used was that sharp! You can check out these and other knives here if you need a visual or brief descriptions.


The icing (another first for me 😃)
I have never ever in my life made icing till this time. Never... so let's see how it panned out... lol...

So this is where I made a mistake... the recipe said 'icing sugar' but I used normal granulated sugar...
Well, if you've ever made icing before you'd be familiar with the impact of my choice... lol... yes... little crystals distributed within the icing.... not particularly entertaining unless you like biting into sugar crystals in icing... lol!
So lesson learnt, when it comes to baking and confectionery, I will really take note and barely cheat on the type of sugar when its been specifically called out. Icing sugar is icing sugar, I'll stick to that... lol

I love replacing essence with Robertson's Mixed Spices, so this is what I did here. I used 4 shakes to replace the approximate teaspoon of vanilla essence.


I don't own a cake display unit yet, so I created the following from the lid of a plastic container that had a transparent bowl. I chose this container so I could decorate my cake on the lid and cover it with the bowl. No need to move the cake and smudge the icing, and it was good for slicing the cake and simply decorating it. #hackalert... lol


Contrast achieved

One of my friends bought this for me. I found it pretty useful as my other cookie press started to open up at the seams when I made my garlic straws for the first time.
So with my gift, my darker icing, and my covered cake, I continued my first ever icing job and Ta-daaa!!!

My first icing job was born! Pretty unprofessional in look, but the extreme pride in my heart remains. So proud of me 😆

So this is where I made a mistake... the recipe said 'icing sugar' but I used normal granulated sugar...
Well, if you've ever made icing before you'd be familiar with the impact of my choice... lol... yes... little crystals distributed within the icing.... not particularly entertaining unless you like biting into sugar crystals in icing... lol!
So lesson learnt, when it comes to baking and confectionery, I will really take note and barely cheat on the type of sugar when its been specifically called out. Icing sugar is icing sugar, I'll stick to that... lol

I love replacing essence with Robertson's Mixed Spices, so this is what I did here. I used 4 shakes to replace the approximate teaspoon of vanilla essence.

Since I wanted to create contrast with my icing, I ended up using only some of the chocolate powder, and then added the rest and whipped the icing again after I had covered the cake.


I don't own a cake display unit yet, so I created the following from the lid of a plastic container that had a transparent bowl. I chose this container so I could decorate my cake on the lid and cover it with the bowl. No need to move the cake and smudge the icing, and it was good for slicing the cake and simply decorating it. #hackalert... lol


Contrast achieved

One of my friends bought this for me. I found it pretty useful as my other cookie press started to open up at the seams when I made my garlic straws for the first time.
So with my gift, my darker icing, and my covered cake, I continued my first ever icing job and Ta-daaa!!!

My first icing job was born! Pretty unprofessional in look, but the extreme pride in my heart remains. So proud of me 😆

With a piece of my first layered icing cake...

... this lengthy Ndudu tales post comes to an end. On behalf of the Ndudu team, thank you so much for reading. Do leave your comments below...
And do let us know if you tried this recipe and used any of our hacks.
If you learnt anything new, or simply enjoyed this read, please like this post and/or share with others 😊
Till we meet here again, have a wonderful baking experience whenever you get to bake and an awesome Foodie experience with each bite or drink you have 😁


